Categories: all aviation Building a Biplane bicycle gadgets misc motorcycle theater
Sat, 12 Sep 2020
Building a Biplane: Cutting Spars
The most expensive single part in the wing of a Marquart Charger is a wing spar. This is the long piece of wood which runs from the root of the wing out to the tip, and is the backbone of the wing, if any creature had two backbones at once. There are two spars, see, so the analogy only sort of fits.
In any case, the spar is a piece of aircraft-grade Sitka spruce (and as soon as you describe anything as "aircraft-grade" you can just see the dollar-signs rolling up in vendors' eyes), either 11 or 12 feet long depending on whether you're talking lower or upper wings. It's an inch thick by about four and a half inches tall for the front spar, or about two and a half inches tall for the rear spar.
One of these glorified two-by-fours costs between $110 and $150 apiece, depending on length and size. Because of their length, shipping a single spar and shipping all eight spars costs about the same: around $200 when I ordered mine, more now. However, even more than their monetary cost is the cost in time. When I ordered my spars a few years ago, it took Wicks Aircraft 6 months to finally realize they couldn't get good enough spruce any more, and cancel my order as they got out of the spruce business. It took Aircraft Spruce, the only company left in the country (as far as I'm aware) who was capable of filling the order, another 6 months or so to finally ship my spars out to me. (No negative reflection on either company, this is a really tough market to deal with.)
The problem is that aircraft-grade lumber is rare. The loggers have to carefully lower an old-growth Sitka spruce tree to the ground, either with a crane or a helicopter, to avoid compression fractures as it falls. It has to be treated carefully, and it needs to be nearly perfect: no knots, no sap pockets, perfectly straight grain of an adequate density, etc. All of which is to say that you can't just call up the lumber yard and order a replacement spar if you mess one up. Wicks said they got a new shipment in every week and in 6 months didn't find enough wood of a high enough quality to fulfill my order. Talk about overhead.
As a result, I've been half-terrified of actually cutting my spars ever since I got them. If I mess one up, not only am I out $300+, I'm down for around 6 months while I wait for a replacement. "Fortunately," I've been learning all about the expense of aircraft parts, so $300 barely causes an eyebrow-twitch any more as I ponder $1,500 radios, $3,000 ADS-B transponders, and $27,000 engines. (I knew it was going to be this expensive before I ever started, but it still amazes me sometimes how much this stuff costs.)
So, how am I going to approach the actual cutting of my spars? Very very carefully, that's how.
I need to do a number of operations to the spars, but the first and most frightening to me is cutting the top and bottom angles. Because wing spars are part of an excitingly curvy airfoil-shaped wing, and to simplify the construction of the ribs, they're cut at an angle on the top and bottom surfaces, rather than being square.
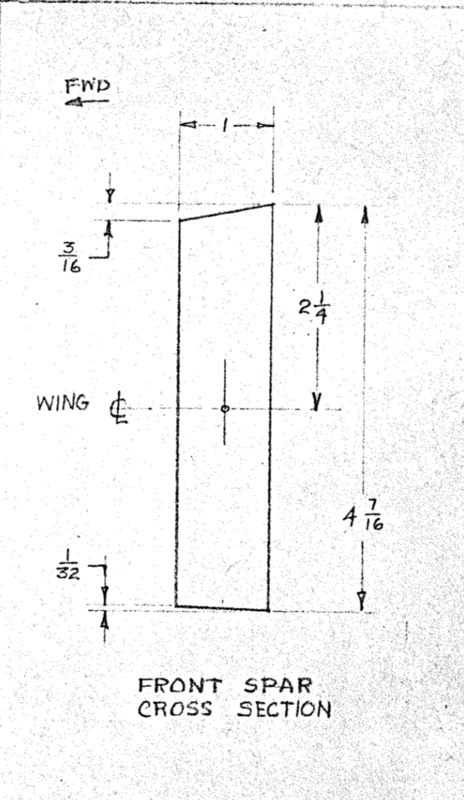
The front spar's profile
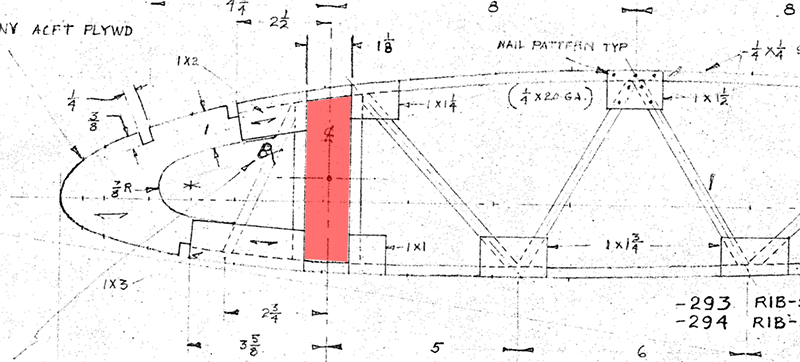
The spar fits into the rib in the red section, which shows why
it needs to be angled
The main reason it's the most frightening is that it involves the use of the table saw, which is nothing more than a raw saw blade poking up out the top of a table, without all the sensible guards and precautions of a nice bandsaw. It's so easy to accidentally shift a little bit and carve a big divot out of whatever you're cutting. Not a huge deal when you're cutting a piece of crappy plywood for a theatrical set that's going to be up for 6 weeks, but fairly daunting when it's aircraft-grade spruce on the line.
The way to prevent this from being a problem is to lock that fancy 2x4 down as much as possible. Make it so there's literally no dependence on the steadiness of my hand as I guide a twelve-foot piece of lumber through the saw. This is the idea I got from another Charger builder, who sent me some photos of the following idea:
- Acquire a long piece of steel, at least ten feet long, preferably longer, to act as a fence
- Set up the fence on the table saw at the appropriate distance for the cut to be made
- Add multiple "platforms" along the bottom of the fence, to support the lumber being cut
- Add feather boards to the platforms to hold the lumber in its exactly correct position
- Add feather boards above the blade to keep the lumber pressed down to the table
- Practice on a small piece of spar material (or other 1" thick wood) until the cuts perfectly fit in rib openings
- Cross fingers, kiss blarney stone, rub lucky rabbit's foot, etc.
- Cut the real thing
Tonight, I gathered together all the pieces needed for steps 1 through 5, or at least those I already had on hand. A few months ago, I acquired a twenty-foot-long section of rectangular steel tubing, which was pretty ridiculous to bring home on my little truck, but it works great now that it's here. The platforms were made out of the very useful piece of MDF I've been slowly nibbling on over the last few months. My clamp-related oniomania has paid off, and I had plenty of clamps on hand to get everything set up. I only have three feather boards and I'd like to have five, so I'll have to find two more, and the Kreg feather boards are pretty awesome, so I'll be getting more of those. Finally, the rolling stands I got a while ago made excellent end-supports to keep the fence from rotating due to the unbalanced weight of the little MDF platforms.
This is the final result of the first attempt to set most of it up:
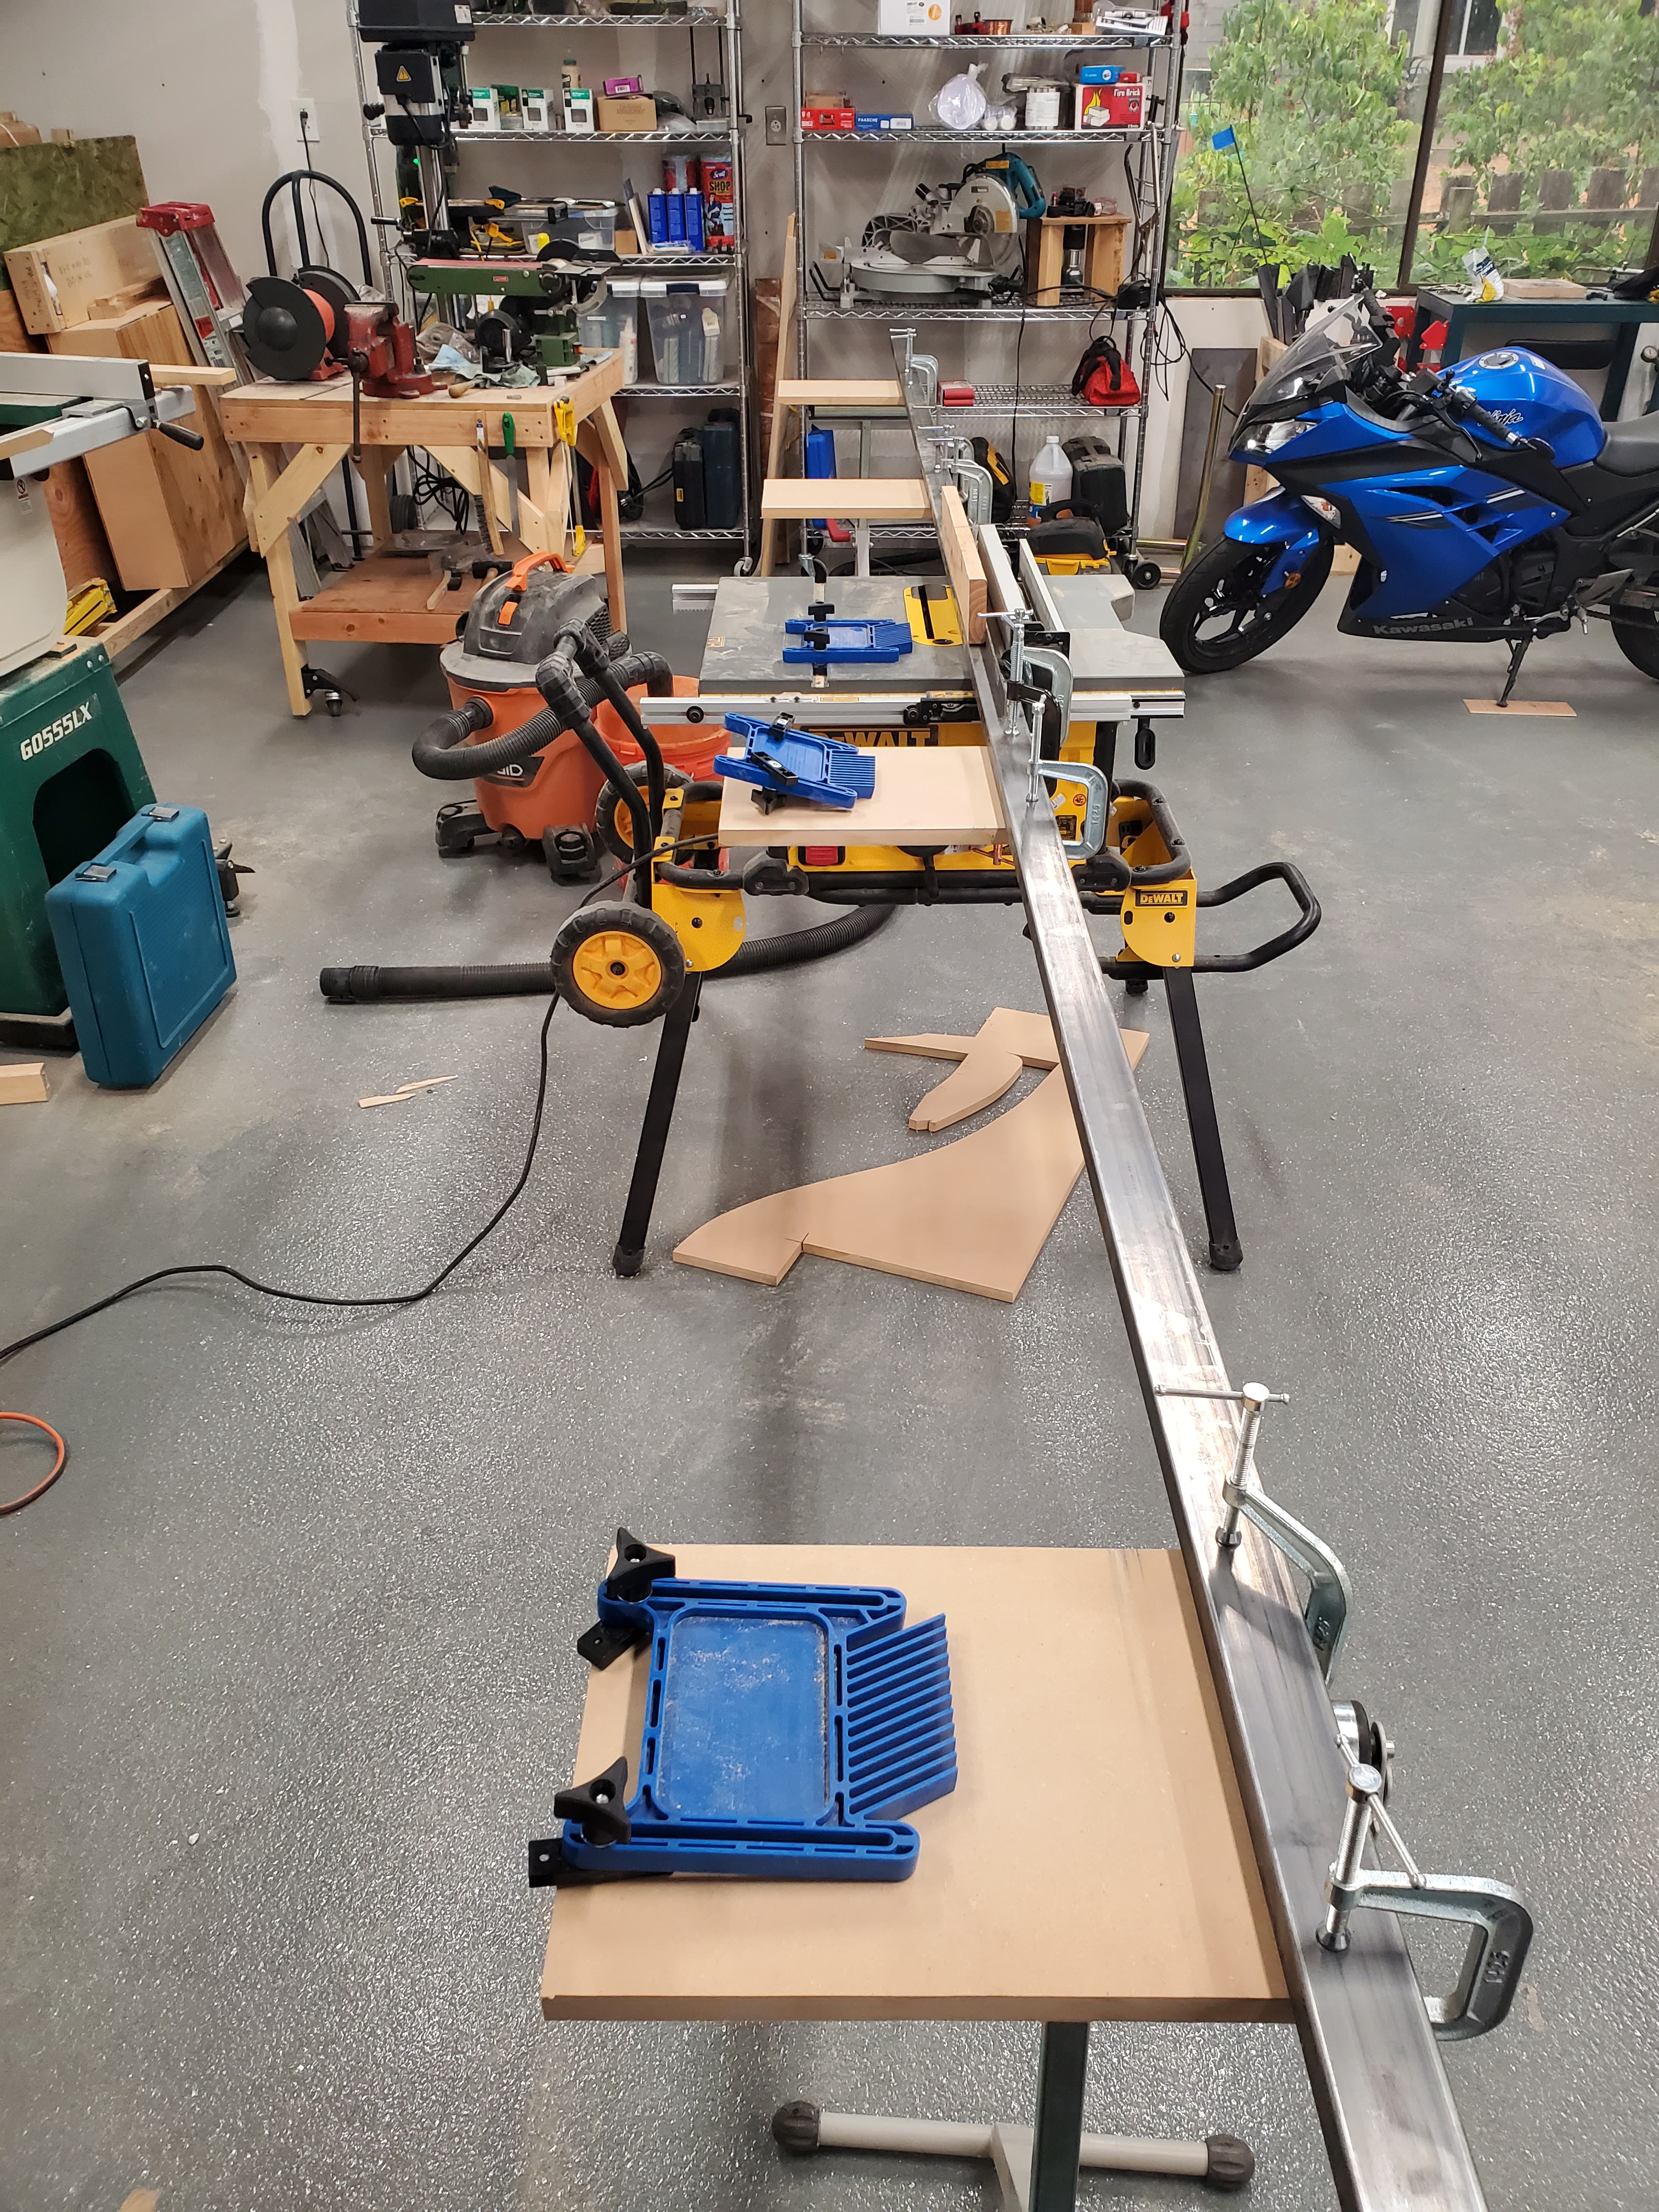
The Very Long Fence set up on my little construction table
saw
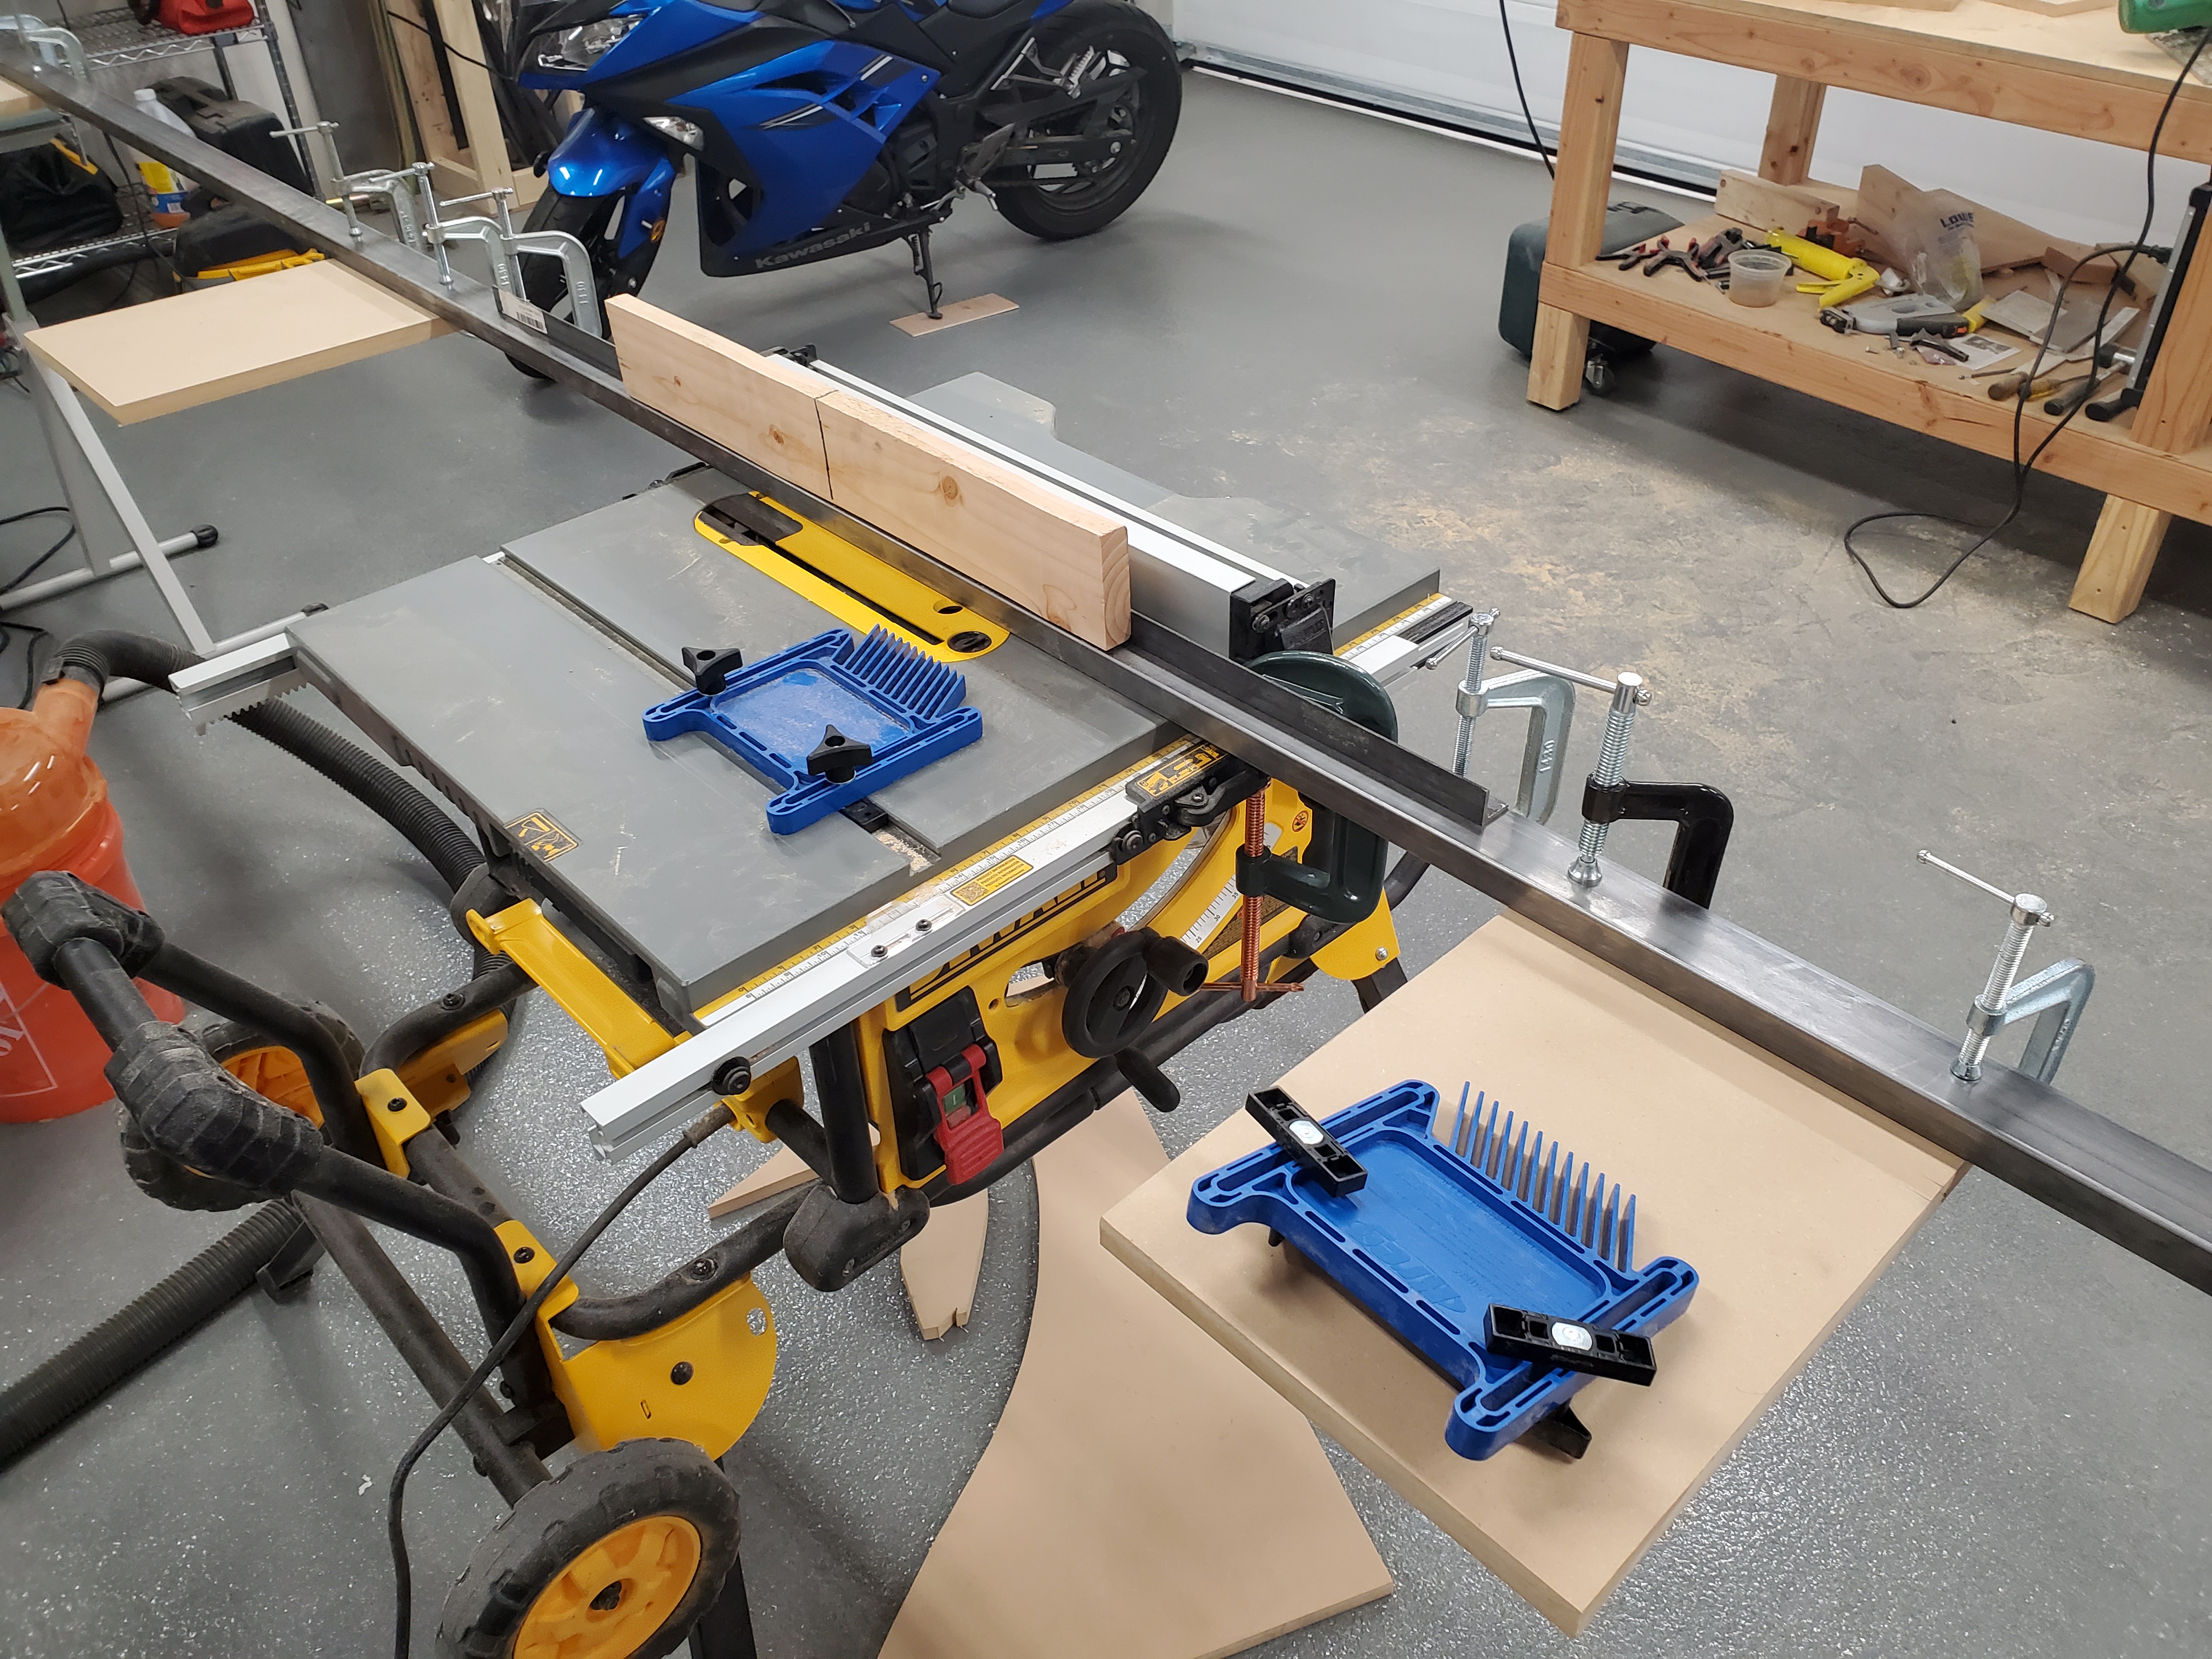
Close-up of the business portion; no cut distance set, this was
just the first shot at the idea of the thing
It probably won't work in this position, as the steel is only 20 feet long, so there needs to be about two and a half feet of space off either end of the fence for this to work with a 12 foot spar. Fortunately, this isn't the final setup, just the first attempt, and it'll be shifted around and reorganized so it will work -- moving the saw so it's sitting diagonal to the space will provide plenty of room. Another time I'm glad the whole shop is on wheels.
I picked up a couple of 2x6s to trim down into faux spars, so I'll get a couple good shots at doing "the real thing" without actually doing the real thing. Fortunately, I have the shiny new bandsaw to resaw the 2x6s with, so I can get closer than my previous attempts using the table saw for resawing, which never turned out quite right.
I suspect that this is going to result in a video as well, but no promises. I find that I'm usually interested in taping the big scary stuff (or at least the stuff I find big and scary), just so I can get through it, have proof I did it, and can show everyone else that it's not as big and scary as I thought it would be, which is invariably the case.
Posted at 23:23 permanent link category: /charger
Categories: all aviation Building a Biplane bicycle gadgets misc motorcycle theater