Categories: all aviation Building a Biplane bicycle gadgets misc motorcycle theater
Mon, 26 Nov 2018
$50 COOAU 4k Action Camera Review
If you go to Our Favorite Online Retailer that Used to be a River, you will find about a gajillion "action cams." These are little boxy cameras that always come with a hard plastic case so they can be used underwater, and usually fit onto a now-universal two- or three-bladed mount first pioneered by GoPro. They range in price from about $50 for the cheap Chinese knock-offs to many hundreds of dollars for the name-brand versions.
I still own a first-gen GoPro, which was powered by AAA batteries that would inevitably rattle loose about mid-ride when I was filming motorcycle races back in 2008. I don't think it works any more. It was ok, but felt pretty chintzy at the time, and didn't have a screen on the back or any more feedback than a little LCD panel with a number and a couple icons on it. Times have changed.
A few years ago, I got a Xiaomi Yi 4k 2 camera, which was, at the time, a $250 Chinese work-alike of the $400 GoPro Hero 3. It wasn't a cheap Chinese knock-off though, and I've actually been pretty happy with it. Its biggest problem was that the 1/4" tripod mounting screw broke out of the body. The thing it never did that I wanted it to was to take an external audio input.
So, a week or two ago, I typed some appropriate search terms on our retailer's site, to see if I could find an inexpensive camera that would take an external microphone. Sure enough, there were a gajillion of them, priced between $50 and about $150, all with brand names that make your eyes bug out, they're so weird. So of course I chose the $50 kind. Here's part of the description they apparently came up with on their own:
COOAU Sports Camera comes with several powerful function,such us Loop Recording,Time-Lapse Shooting, Car Model, Underwater Model,Slow Motion,Audio Record,Burst Photo, giving you the texperience of a digital camera.Exposure Value and White Balance meet various needs under specific conditions.The F2.5 Lens allows more light to enter the camera to make sure the photo and video are extreme clear under low light conditions
(Text copied and pasted from big online retailer site, can't add enough [sic] tags without making it ridiculous.)
COOAU's motto or saying or subtitle or whatever you want to call it is "MAKE YOU COOL & PROUD". Sure.
![]()
What it Comes With
So anyway, it's a $50 camera that includes the camera, the waterproof case, a plethora of mounting widgets, an external microphone (yes!), not one but two little batteries, and a carrying case. This is one of those cases where you wonder how they can afford to sell them for this price. It claims to have a Sony sensor, but I would be surprised to learn it was a recent Sony sensor.
First Impressions
The first impression as I laid my hands on the camera itself was actually pretty good. It's covered in a soft, grippy rubber that feels much higher quality than a $50 action cam has any right to feel. Fortunately, as soon as you check out the buttons or actually turn it on, you're back into reassuring territory. The rear screen turns on at a nearly obnoxious brightness with the bright white COOAU logo splash screen, and a tiny, tinny power-on noise plays through a speaker that must be 2mm across. It cuts off before it's finished, and the screen blacks out, and you think something's wrong. Then the screen lights back up again, and you're looking through the sensor and very wide-angle lens.
The lens itself is quite wide, 170° according to the description. It's described as being fish-eye, which is kind of right. I'd rate it as about half-way to fish-eye, like they were trying for rectilinear, realized it was way too much work, and gave up. It's not bad, it's just kind of its own thing, neither rectilinear nor fish-eye but somewhere inbetween. Initial testing inside the house at night (unlikely to be a cheap action cam's strong suit) was not terribly encouraging, with noticeable grain and poor dynamic range.
The user interface is useable, but a bit on the weird side. It has three buttons across the top: power, M, and a circle. The power button is pretty obvious until it's not; you quickly discover M means Mode; and the circle is the most sensible of the three, being either record or select. The M button switches you from video to still camera, then to video review, then photo review, then settings. Once you're in settings, it keeps looping through until you get to the Exit Settings mode (a U-turn arrow icon), and press record/select; if you press M again, you're back to the first settings screen, which takes some getting used to. The power button, once you're in settings screens, moves the cursor to the next thing. So if you want to set the video mode, you press M until you're on the video settings screen, then press power to move the cursor down until video mode is highlighted. Then you press select to enter the setting, power to move to the option you want, and select to pick it and exit back to the higher level menu -- there is no "back" button, you just gotta select something.
My initial tests with the internal and external microphone suggested that the internal mic is probably made of the same materials that go into a foxhole crystal radio, and very nearly doesn't record sound. The external mic, on the other hand, sounds pretty good, though it peaks quickly, and doesn't seem to offer any kind of gain control.
I was immediately annoyed with the battery cover, a small piece of plastic the size of an elongated postage stamp, which is sure to become lost within a month of owning the camera. I understand that the hinges on other cameras can be problematic, but this completely disconnected battery cover seems like a step in the wrong direction. Fortunately nothing will fall out if the cover goes missing. Along the same lines, the port cover on the other side of the camera is amazing for its ability to snug back down into its ports even when you are explicitly trying to plug a cable into one of them. It has to be actively restrained from getting in the way.
Actually Using It
The reason I got this thing in the first place is to record my melodious voice as I fly around in my little airplane. The first proof-of-concept test was to jam the external mic into the headset's earcup, and use that to record what my ear would hear. For lack of anything better to film, I aimed the COOAU at my ugly mug, while the Yi did its standard duty of aiming out the windshield to show a more-or-less pilot's-eye view.
I mounted the two cameras with a combination of the relatively heavy pro clamp mount I use with the Yi, and the pile of mounting widgets the COOAU came with. Mounting options in my Champ are limited, so the COOAU (facing me) ended up really being a receding-hairline-watch camera rather than a good view of my face. Not the camera's fault.
I fired up the plane, and jammed the mic into my headset. I had no idea what the audio would be like, though in reviewing it, it's at least usable. Unfortunately, keying the radio results in huge distortion (not too surprising), so I will be subtitling the video that will end up at the bottom of this review. Fortunately, this is not a challenge that most users of the COOAU 4k (remember, "Make You Cool & Proud!") will run into.
The flight went as well as I could ask, and as I write this, I am in the midst of exporting videos so that I can edit them together. I've reviewed some of the COOAU footage, and it's actually pretty decent. The dynamic range compression is still there, mostly noticeable as JPEG-artifact blowout on my giant forehead when I lean forward. The finished video will not be color corrected or adjusted in any way other than cuts (you don't want to watch an hour-twenty of me flying around, it's rull boring unless you're actually there), so that you can see exactly what comes out of the camera.
As is common to avoid creating over-large files, the COOAU 4k splits its videos up into 15-minute chunks when recording 1080P at 30 FPS. There's probably a more efficient way to join them together than what I'm doing, but I never claimed to be an expert at editing video.
I'm using Davinci Resolve 15 for my editing (because free, also awesome) on a recent iMac, and one problem cropped up: although the built-in QuickTime Player app would play back the audio on the COOAU clips, Resolve couldn't decode them. They just came across as silence. Many of the questions about the camera on our retailer's site had a canned response from COOAU about making sure audio worked right, and defensive statements about how it's AAC audio, so evidently COOAU is sensitive about this audio issue. I got around it by using the QuickTime Player to export the audio. The resulting m4a file imported well into Resolve, and it was a matter of mere moments to line the audio up with its clip.
I had the COOAU mounted upside-down, and forgot to set the "upside-down" setting. As a result, I had to flip the videos in Resolve, which is fortunately a trivial operation. The Yi automatically detects when it's upside-down, a feature that I have appreciated, and appreciate even more now.
One thing to note is that the batteries can only be charged in the camera. Charging from nearly-empty takes an hour or two on a normal USB port. One battery lasted me for an hour and seventeen minutes of recording, though it showed no bars left when I shut it down. It appears to work fine when plugged into an external power source, so vehicle use will only be limited by storage space, and it does include a "loop" mode that only records the last N minutes of footage.
My camera came with a card in the package saying I'd receive a free battery if I left an "honest review" on our retail site and told them about it, which I'll probably do for yuks, because free stuff.
Conclusions
Reviewing the footage from the Yi and the COOAU, there's no question that the Yi looks nicer. Does it look five times nicer? Not really. The footage from the COOAU is pretty good. I can't really compare the internal microphones, as I haven't played with the COOAU's mic.
The Yi uses a touchscreen for most of its settings, which offers an interesting comparison: since the COOAU is not a touchscreen, you can do all the setting and adjusting you want with the camera while it's in the watertight case. That's not true with the Yi. Score one for COOAU (Cool & Proud!).
Is the COOAU worth fifty bucks? No question. I'd actually say it's a pretty good deal for $50. Not only do you get a halfway decent action cam, you get a bunch of mounting widgets and a pretty good carrying case. If you're coming from a GoPro or Garmin or Sony or similar high-end camera, you'll probably be disappointed in the quality, but that's kind of not the point. It's a fifty dollar camera. I could strap it to my wing, and if it departed the plane, I'd be considerably more worried that it would damage something when it landed than that I'd lost the camera. It's a perfect "disposable" camera if you need an action cam for something dangerous enough that you'd hesitate to put your $500 GoPro in that situation. It would be a fantastic My First Action Cam for a young person to strap to a helmet or handlebars or snorkel mask.
It even records external audio with a perfectly standard 2.5mm mono phono plug, no weird, hard-to-find adapters needed. I'll probably look for a smaller microphone if I want to keep using it inside the headset, the supplied mic is a fairly chunky 12mm in diameter.
In all, I'd say it's a good deal on an acceptable camera. This is not the camera to get if you want to include your footage in your high-class indie film (unless low-quality footage is the gimmick). It is absolutely the camera to strap to your amateur rocket to get a cool shot you'd hate to try with a higher value camera.
Coming Soon
This review is not finished. I'll be taking some photos and possibly more video to show some of the idiosyncracies of the camera. Check back in a few days.
Posted at 09:47 permanent link category: /gadgets
Fri, 18 Dec 2015

Back in March of this year, I started working on an idea I'd had: a very darkroom-specific timer. It needed to generate absolutely no light (eliminating anything that runs on a cellphone) so the film I was processing in open trays wouldn't be fogged. It needed to be easy to operate in the dark, ideally just a single button press. It needed to clearly indicate its status when running, ideally giving me reminders at reasonable intervals for things like agitation of the developing film.
Thus was born the Darktimer (page not quite ready for prime time as of this writing, but you get the idea). I wanted it to be a simple project, with minimal hardware requirements: an Arduino, an LCD, some buttons and a speaker. It should be written using test-driven development. It would ultimately be written up and shared as an open-source project in case anyone else wanted a slightly task-specific serial programmable timer.
I worked on the firmware off and on for the next ~8 months, making gradual progress on the feature set. I knew the hardware would be simple, and I was able to set up a cobbled-together prototype in late summer. I ordered parts to make the real thing as summer turned into fall, but theatrical committments took up all my free time for a few months.
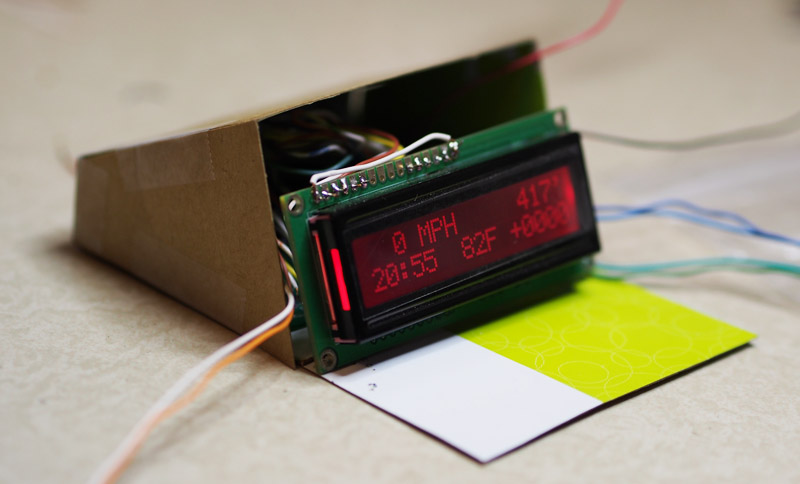
Finally, this month, I started putting the pieces together. I got the smallest premade case I could find that would probably hold all the pieces, although it's gigantic and mostly contains air. I cut and drilled the case to fit the LCD and the various switches. Two nights ago, I had it working perfectly, and it only needed the Arduino Pro Mini to be affixed to its foam tape, and the speaker holes drilled, when I pressed a bit too hard on the board, the Pro Mini made a little click! noise and the screen started spewing garbage.
So last night I soldered in a new Pro Mini (I'd ordered 5, since they're useful, and at $5 apiece, they don't break the bank), and programmed it. Voila, functional Darktimer! I screwed down the case lid, and applied some slightly-askew labels to identify the buttons, along with a Dangerpants logo sticker.
Then I noticed it: a glowing, happy feeling. Unusual. Buoyant good mood. Oh right: I Finished a Thing.
I seem to have lots of ideas, and start on lots of projects, but it's remarkably rare that I actually take one of those projects all the way through to completion. Particularly not the ones that involve making a physical thing. Sufficiently rare that I had completely forgotten the pleasure that comes from forming this abstract idea I'd had months before into a real, functional device sitting in front of me, gently counting down the seconds based on a timer I programmed using the front-panel buttons. Just like a real consumer device. Weird.
It's not perfect: the upper three buttons are too close to the LCD window after I momentarily spaced that I was going to have an LCD window; the labels were affixed slightly askew; the speaker is very quiet with no volume control. I have three or four ideas for improvements that would make it more useful in the darkroom. But it works, and it does the job I set out to do, and it's finished.
It's a nice feeling, and one that I had forgotten. I finished a thing.
Posted at 12:12 permanent link category: /gadgets
Tue, 08 Jul 2014
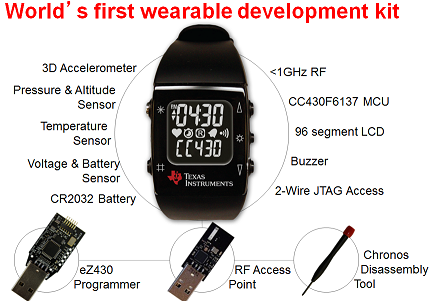
I've been eyeing the ez430-CHRONOS watches for a year or so (since discovering that someone had written code for one to have it show Mars time). The $60 price tag was always too high for what I knew would be a relatively throw-away toy.
So, when I found this page at 43oh.com (a 60% discount if you use the CHRON_SCORE coupon code, apparently related to the World Cup), the temptation was too great. Assuming TI's atrocious store UI didn't lead me astray, I have a 915 MHz version headed my way.
If you're interested in a programmable watch with open-source programming tools, this seems worth following up on, but it expires on July 14th or 15th (it's not obvious to me which), so don't dally.
I'm not sure what I'm going to do with it (probably a first test will be to load Mars time), but it should be a fun thing to play with. You know, in all my spare time.
Posted at 14:56 permanent link category: /gadgets
Fri, 27 Jun 2014
Note: pictures are on the way, check back in a few days
I found myself unemployed early this year, and so when a friend approached me about a job to build a kind of odd mechanical thing, I was receptive. "So, money, you say?" I said, Zoidberg-like. Plus, it sounded like a very interesting commission: build us a miniature version of the ball-drop they have in Times Square, which takes 60 seconds to go from the top to the bottom, making it a perfect countdown to New Years.
This version would be about 8 feet tall, and miracle of miracles, he had a real budget for me to work with. I said yes, of course. Someone willing to pay me to weld and build a weirdo device? No question.
So, I was off into the planning stage. It would be made of steel pipe! With a disco ball! And maybe one of those cheap Harbor Freight hoists providing the motive power! I called upon my friend Alex (possessor of welding know-how and a similarly slightly-mad genius for all things mechanical and off-beat) and we spend a couple of hours batting back and forth design ideas. We eventually settled on a steel mast with the hoist mounted at the base; the hoist cable would run up the inside of the mast to a pulley, which would grab a cable draped across the top of two pulleys at the top of the mast. The ball itself would be mounted on a steel core, sized just bigger than the mast. It practically builds itself!
I then went window shopping, and came up with an estimate for Todd. It was nearly $2800 for parts and labor, and to his credit, he didn't even blink. "Sounds great!" he said. I triple-checked that everything was cool, then I went shopping for real.

An early drawing to establish scale and show the top-sign
One of the sticking points was the mirror ball. It seemed like such an obvious choice, but when I started talking to the mirror ball distributors, the word that came back was, "We don't recommend doing what you're thinking about doing." I was talking to them about cutting a 6" hole in the top and bottom of the mirror ball and installing my own core, so that the whole thing could move up and down the mast. But they were having none of it.
Interesting side-note: a 30" mirror ball is fairly easily available, and cost about $900 when I was doing my research. A 24" ball (which is the size I ended up going with) was about $350. They're made of fiberglass at that size (with a vast quantity of glass mirror tiles on them, they're quite heavy), and have a stout steel rod that runs from the north pole to the south pole. The sticking point was some variety of either 45° or equatorial stay that would mess up my "cutting a big hole" plans. No one ever described it beyond that level of detail.
So, I threw my hands up in the air, and sought other options. I considered and discarded a 24" styrofoam ball, and eventually found an acrylic sphere at a place called California Quality Plastics. A mere $200 (plus $44 shipping) later, and I had my ball on the way. I found a fantastic material made by Rosco (who I know for making colored gels for theater lights) which is a 15 foot long roll, 24" wide, of little half-inch sized circular diffraction spots -- like a sheet full of tiny, dime-sized CDs. It's even adhesive backed, making it perfect for my use.
In the mean time, I'd retrieved my steel bits, picked up the hoist, and ordered the surprising amount of electronics I was going to stuff into this thing. I'd had this great idea: why not add an embedded controller (I'm getting all giddy over embedded hardware these days) so that the control would be a dead-simple, "Push button, it moves the logical direction," type control? I thought about it, and realized that it would be very simple to create: you just need a limit switch at each end of the travel, a user pushbutton, and some relays.
I sat down and wrote the code using my now-favorite method of test-driven development, and in a few hours had it done. I consulted with my dad on the electrical gubbins of the motor control, and he suggested adding hard logic external to the microcontroller so that even if the controller freaked out, the limit switches would kill power to the motor. We decided on solid-state relays, which offer a number of advantages over mechanical relays.
The next step was to take Alex up on his offer, and go over to Bainbridge Island to do the welding. I loaded up the truck, and got on the ferry. Eight hours of cutting, drilling, grinding, and flying sparks later, we had our bits ready to go: one 8' mast, one base plate, one ball carrier, and one somewhat complicated-looking mast topper, with pulleys and a little frame on which to mount the top sign. It's amazing what you can do with an angle grinder and a MIG welder.
Once I got home with the finished pieces, I had to puzzle through how to mount all the electronics and the hoist together. I'd gotten a piece of the thickest plywood I could find to use as a base. The plan (which worked as well as I might have hoped) was to cut the sheet in half for a 4x4' base piece, and use the rest to make a box which would fold down over the motor and control board. I sized the box to be a bit too big (good thing), and it all fit in with a bit of Tetris-inspired thought.
I put a lot of thought into how to make this thing as safe and foolproof as possible. So the microcontroller program is designed with a bunch of failsafes built in, it has external logic that will force the motor off, there's an internal circuit breaker, and a big red kill switch. In addition, the user interface (a single button) is designed to be as simple as possible: no matter where the ball is or what it's doing, the pushbutton does the logical thing. If the ball is sitting at the bottom of the mast, the pushbutton starts it going up. If it's at the top, it start going down. If it's moving, the button stops it. If it starts again, it's going the opposite direction it was previously going. The limit switches make sure the motor can never be switched on in the wrong direction.
Everything seemed to be going perfectly. I had the contraption assembled, and had run it up and down the mast a few times with no problem, and my girlfriend arrived, so I eagerly showed it off to her. "Voila!" I said proudly, and pressed the button. The ball didn't move. The motor made the loudest buzzing noise I've ever heard. I slammed down on the emergency kill switch, puzzled. I tried again. Buzzing. Kill switch. Again. Buzzing. Kill switch. Huh.
There followed a distressingly long period of time in which I was utterly baffled. Multiple phone calls with my dad (an electrical engineer in his working life, and vastly ahead of me in all electronic knowledge), testing, thinking, testing again. All seemed to come to naught. My pace faltered, and I stopped working on the project as some more immediate things came up. But it was a looming presence: I was being paid for this, and the deadline wouldn't move. It had to be done in time for the Pride parade, on June 29th.
Finally, I had some time again (having in the mean time applied my sparkly stickers to the ball, created a slightly cheezy carrier for the ball itself, and figured out the mounting of the ball to the core), and tried to tackle the problem methodically. Of course, the only place I could set this thing up, being so tall, was outside, and of course the weather didn't particularly cooperate. There was a several-week period where I had a big tented blue tarp on my deck as I waited for breaks in the weather. Putting it up and taking it down is enough trouble for one person that I wasn't eager to do it more often than I had to.
My methodical testing didn't seem to be going all that well. The problem was that apparently at random, the motor would go into this buzzing state. In discussions with my dad (who researched and figured out the circuit I was trying to replace with my control system), it seemed that the motor-run capacitor wasn't getting switched on correctly. I replaced the solid-state relay, but that didn't really change anything. I checked and re-checked that it was getting the signal it needed to switch on. I confirmed that it was failing the way we thought it was.
Finally, it was just idle, disconsolate fiddling that uncovered the problem: I noticed that the buzzing only happened some of the time, specifically when I stopped the ball mid-mast, and tried to start it again. If I let it go up to the top or down to the bottom (thus hitting the limit switches), it almost always restarted with no problem. Of course I could take out the feature of being able to stop and restart mid-run, but that seemed silly. I stared at the logic schematic, and it hit me: if the ball went to one of the limit switches, the external logic instantaneously shut off the up or down switch, but the microcontroller took a little bit longer, maybe 5-10 milliseconds, to shut off the capacitor switch. That must be what was making it work.
This didn't entirely make sense, of course: the control switch Harbor Freight ships with the hoist certainly doesn't have a 5-10 ms delayed action anything going on. It's just a switch. The whole thing costs a hundred bucks. There's nothing fancy going on. However, I modified the circuit so I could separately control the capacitor, and as soon as I started switching it off a little bit after the up or down switch, the problem disappeared.
I called my dad to explain my solution, and we figured out what's really going on. The solid-state relays (awesome cool devices that they are) have a thing called "zero crossing switching." What this means is that the SSR waits until it sees the AC voltage crossing up or down through zero volts (it swings between +120 and -120 volts (actually +170 and -170, but that's a different topic) 60 times a second) before it switches on.
A capacitor, for the purposes of this discussion, can be thought of as a sort of instant-charging battery. It takes a fraction of a second to reach a full charge, and a fraction of a second to dump its charge, but it will hold onto a charge for quite a while -- one of the dangers of working on CRT televisions is that the giant capacitors they use can remain charged and dangerous for years.
Well, when you have any voltage, it has to work against some reference to actually be a voltage, which is what ground is for. The difference between ground and your hot line is what voltage is. So, AC power should be going -120 to 0 to +120 to 0 and so on. But if there's a capacitor between ground and your hot line, the capacitor can effectively float up the whole equation so that (for instance), the AC signal could look like it's going from 0 to +120 to +240 to +120 and back to 0 before starting over. It's still swinging over the whole range it's supposed to, but bumped up relative to ground. So, and this is the important part, it never crosses zero.
As you may recall, my solid-state relays have a feature called "zero crossing switching," which prevents them from turning on until they see the voltage on the AC line cross zero. If the voltage on the AC line goes from 0 to +240 and back, then it never actually crosses zero.
Capacitor discharged Capacitor half charged Capacitor fully charged
One of the clues that helped me find the problem was that I would connect the capacitor switch manually, and hear the motor make a little clunk noise. This supported our theory: by leaving the capacitor connected a little bit longer than the up or down switch, the capacitor had time to discharge into the motor. Then, it wouldn't be charged next time the motor got switched on, and the SSR would see a zero-crossing, and switch on like it should. Of course the stock control handle never had this problem: it's a mechanical switch that cares not for zero-crossings. It will switch the capacitor on, no matter its state of charge.
Once we finally figured this out, it was a huge load off my mind. I was dreading the problem, because I knew it would come out at the least opportune possible time. The ball drop is destined to live on a parade float for about four hours, and I just knew if I didn't solve the problem, it would crop up somewhere mid-parade. Obviously not acceptable.
In the mean time, as I mentioned earlier, I had sorted out the ball itself, which was more trouble than I'd expected. The first problem was that it wasn't quite the twenty-four inches in diameter that CQP had promised me. It was, in fact, more like twenty-two. Not a huge deal, except for the fact that Alex and I had carefully welded up support arms onto the ball core to fit, you guessed it, a 24" ball. It hadn't arrived by the time we were welding, so there was no way to measure it and know its exact size for sure. Not having any welding equipment myself, and being unwilling to dedicate another day to crossing over to Bainbridge and back, I decided to take the easy way out: I cut the extraneous two inches off the bottom of the ball core, and made up wooden blocks to support the bottom of the ball.
Applying the diffraction sticker was also troublesome. The sticker material wasn't stretchy at all, so getting it to fit on the compound curve of the sphere would be a bit tricky. I ended up cutting a ton of 2" squares of material, and applying them one at a time. Fortunately, this allowed me to take in-progress shots that looked like the Death Star under construction, which was pleasing in its own way.
With all the big problems solved, I took the whole thing apart and applied a coat of paint, and the mini ball-drop was nearly complete.
The final touch was to design and build the top-sign. Todd and I had decided on a cylindrical sign, so I made up a graphic file with horizontal rainbow Pride stripes, and the words "Getting to Zero" arrayed across it (the Lifelong AIDS Alliance, for whom this thing was being built, has the theme, "Getting to Zero Cases of AIDS" for the parade this year). After some back and forth with the local FedEx Office store, I got the graphic printed on styrene, which I epoxied to the plywood disc.
Thus, it was with a fairly substantial sense of accomplishment that I loaded everything up in the truck, tied it down, and carefully drove to the Lifelong headquarters on Capitol Hill to drop off my crazy creation. Todd and I set it up according to the steps I'd laid out in the User's Guide (for what crazy contraption can be considered complete without a User's Guide?), and it is even now set up in the Lifelong offices, awaiting the arrival of their rented flatbed truck for the parade on Sunday.
Having done all this, I'm hooked. I want to do more. I'd love to be able to make a living off doing this kind of thing (although I am practical enough to know that I probably can't). Building crazy contraptions and props and learning how to weld and build better embedded controllers.
This was the first official Dangerpants Industries project, and I'm definitely hoping it won't be the last.
Update: I helped Lifelong set up the Ball Drop on their float Sunday morning, and we discovered that, when hooked up to the generator they were using to power their sound system and the Drop, the hoist motor ran slower than when it was connected to wall-power. The problem? My controller cleverly included a 7.5 second cutoff so that if the motor was on too long (such as if a limit switch failed), it wouldn't destroy itself. The traversal had previously been almost exactly 7 seconds, but on the generator, it was more like 9 or 10. So the ball stopped about a foot short of the top of the mast at 7.5 seconds.
After all that work on the control system, they ended up having to use the manual control after all: I'd forgotten to bring my computer with me, so I couldn't reprogram the limit. It's a simple change in the code, but without the computer handy (it would have been a 40+ minute round-trip), there was no way to fix it. I hadn't anticipated that the generator power would cause the motor to change speed so much.
The lessons from this? Always bring the computer if the project is field-programmable, and always test using the actual setup as much as possible. Fortunately, my contingency planning was fine, and there was no practical problem.
Posted at 15:00 permanent link category: /gadgets
Wed, 29 Jan 2014

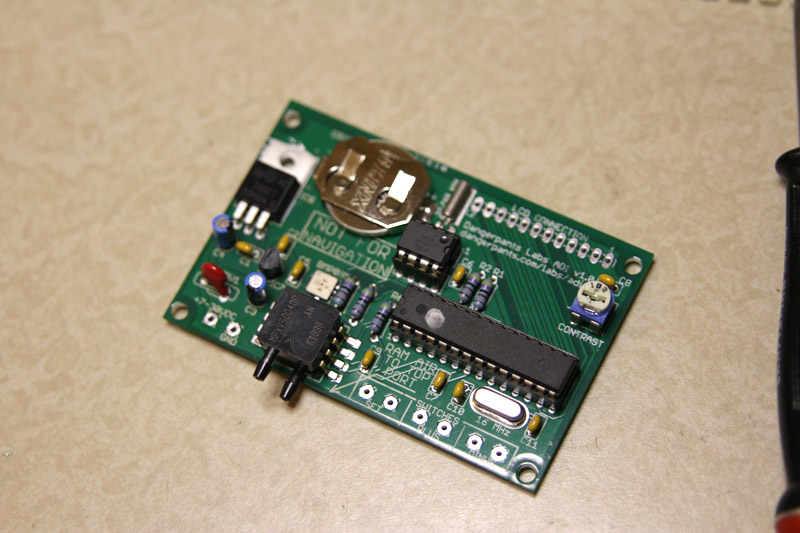
As I mentioned in the previous entry, my OSH Park order for the v1.2 ADI board shipped, and it arrived late last week. There's not a lot to say that the photo doesn't clarify, though. The boards look good, and they even have gold-looking pads instead of the copper I was expecting. No idea if that makes any difference.
One key difference (aside from the purple solder mask, of course) from the BatchPCB boards is that these boards were not cleanly cut along the edges. You can just see, along the lower edge of the front board, a tiny postage-stamp looking tab that didn't get broken off. These leave little jagged patches along the edges of the board. It's not a big deal, but it's something to be aware of.
The turn-around is much faster than BatchPCB, and the price (given that I consistently got two copies of the board from BatchPCB) is comparable, though a bit cheaper per copy at OSH Park. I'm pretty pleased with the service, so far!
Posted at 13:03 permanent link category: /gadgets
Wed, 22 Jan 2014
When I discovered that the altitude sensor on my Air Data Instrument was discontinued, I leapt! into action! Well, at least, I opened up the Eagle files for the circuit board, to see how hard it would be to make a new board that would fit the replacement sensor.
Turns out it wasn't much work, so I put together the Dangerpants Labs Air Data Instrument v1.3 board, which includes the correct layout for the new version of the sensor (the BMP180).

Before I had realized that the part changed, I had ordered a set of v1.2 boards (which are still available if you have a spare BMP085 you just gotta use). I was curious to see what OSH Park's quality and service were like. I've also ordered a set of v1.3 boards and some BMP180 sensors to play with.
At this point, I've just been notified that my first order of v1.2 boards has been received back from the fab, about a week and a half after placing the order. OSH Park has a relatively verbose notification system that sends an email when the order is received, when payment is received, when the design has been added to a fab order (little boards like mine are compiled together into one big board, which is what the factory wants to make, then cut up into individual pieces), when it's been sent off to the factory, and when it's been received back from the factory. Presumably there will be another email when it's shipped out.
I quite appreciate this level of detail. It's nice to know how things are going. So I'll say that the ordering and shipping process is pretty cool so far. I'll have feedback on the boards once I get them.
The OSH Park website, unfortunately, leaves a lot to be desired. There is no way to search shared projects, you just have to page through the list until you find what you want. Although there are user pages which list shared projects per user (such as my Dangerpants Labs page), you just have to know what the URL is -- there's no way to search for a user, or even a list of users to page through. The interface for people uploading designs isn't a lot better, with some controls in one place, and some controls in another place, and no explanation of where anything is. Their support system is pretty good, and I got a reply to a question within 24 hours. However, I had to log in again, and their FAQ list is squarely aimed at technical questions around making boards (which is good), with no mention of site navigation or how to perform different actions (which is bad, when the site design is comparatively unintuitive like this).
I'm sure OSH Park is aware of these things, and they have them on a list of things to fix. Regardless, they're worth knowing for the general nerdly public who may want to use the service.
It's worth mentioning here that the problem I had was that I wanted to edit a project, which is not possible from the "Projects" link at the top of the page. There's a list of projects, but you can't edit any of them from there, just order, delete or share/unshare. Only when you find the shared project page (which you can only do if you share the project, a fairly major flaw if you're trying to order prototypes of a project that shouldn't be public yet) do you get an Edit button. Fortunately the upload process is pretty straightforward, so re-uploading a project has the same effect as editing it. Not a great workaround if your Gerber files (used to define a printed circuit board) are at home, and you're not, though.
The takeaway from this all should be that OSH Park seems to be offering a good service. They're cheaper than BatchPCB was by half, and their boards go to a US fabrication plant: turnaround is much faster and you can get all wiggly about not sending money/work offshore if that's your thing (as it is mine). It's a pity the website is a bit wonky, but as long as you end-run around their wonkiness by using direct linking (as I did above and on the ADI page), it's pretty easy. I'll report back on the board quality once I get my boards in, probably in the next week or two.
Update! As I was typing this up, the shipping notification arrived from OSH Park. They say I'll have my new boards within two days. So... awesome!
Posted at 12:44 permanent link category: /gadgets
Tue, 14 Jan 2014
I got some interest in the Air Data Instrument over the holiday break, so I updated a few things. In looking further into the project, I've discovered that the altitude sensor part I was using is more or less unsupported -- there's only one US distributor that carries it, and it's not one of the major ones. I noticed that when I was putting the bill of materials together the first time, but didn't think much of it.
When I checked with Digi-Key (which used to carry the part, a Bosch Sensortec BMP085), they said they completely dropped Bosch as a supplier. So... that's not encouraging. Mouser and Newark don't appear to carry anything Bosch except other people's breakout boards.
The ADI uses the BMP085 to sense altitude, and thus vertical speed. The BMP085 was discontinued some time ago, but I wasn't paying attention. Then they brought out the BMP180, which appears to be a current product, but no one (ie, not Mouser nor Digi-Key nor Newark) carries it. So although the BMP180 is available and is a drop-in replacement (possibly except for its footprint on the board, that's not obvious yet), it doesn't appear to be in a strong position.
This is, of course, not a disaster. There is a perfectly fine looking Freescale sensor (the MPL3115A2) which is available at all the major suppliers, and is a quarter the price of the BMP085, at $2.50 or so instead of $8-10. It's about the same size, and about the same power consumption, and uses a similar communication protocol.
But, it's a different part. That means a new board design, and a new code update to support it. If you've been paying attention here for a long time, you'll know that I was last actively working on the ADI in 2011. That's a bit of a gap, and I have a new embedded project I'm working on (details when it gets closer to being a real thing, but I'm currently geeking out on watchdog timers). I don't really want to switch gears and go back to the ADI to redesign it for a new part. On the other hand, it would be an excellent exercise in the kind of work I suspect embedded engineers have to deal with pretty much all the time, as old products are phased out, and new ones come in.
This was all spurred because I just ordered three ADI boards from OSH Park, which bought and consolidated BatchPCB among a few other board fab houses, and I started looking into the resources available to build the ADI. They are acceptable, but kind of minimal. (Side note to interested parties: the shared board design on OSH Park suddenly became unavailable after I ordered it and cleaned up some old projects; it'll become available again some time soon, I suspect.)
So, in the extremely limited free time I see in my immediate future, I may be spending a little bit of it playing with the MPL3115A2 to see if I can integrate it easily into the ADI design. It would be nice to have the whole bill of materials in one place.
Posted at 17:05 permanent link category: /gadgets
Tue, 04 Sep 2012
Oh, You Know, Rapid Prototyping in Cardboard
Like you do.
I've had this concept for a case running through my head for a few months now, and finally decided tonight was the night to check it out. A few quick strokes with the CAD program, and I had all the numbers I needed. A few more quick strokes with some scissors and a handy expanse of cardboard pulled from the recycling bin, and I had my lovely proto-case for the Air Data Instrument:
I'm still working on how exactly it will be executed, but the basic idea is looking pretty sound so far. There appears to be a bit of room to breathe inside the case, and with correctly re-worked wiring, it looks pretty plausible. The buttons (I picked up some nice, lightweight, weatherproof buttons a while ago) will go across the top, and close enough to the front edge that buckling the case shouldn't be a huge worry. Ram air and power come through the back wall. I have to figure out whether this is actually enough room for everything to pack inside, but that shouldn't be too hard.
It's nice to see progress finally: this project has been stalled for at least 8 months.
Posted at 22:06 permanent link category: /gadgets
Mon, 02 Jul 2012
Air Data Instrument Boards Available!
It took a surprisingly long time to sort out my reseller account, but BatchPCB finally did it, and ADI v1.2 printed circuit boards are finally available for sale!
The Air Data Instrument is a long-term project of mine (long-term mostly because I go months between bouts of working on it). In the ongoing spirit of my projects, my goal is not to make any money on it, so it's offered for "free." In the case of the files, this means you can download them for free, and I'll offer limited assistance getting things working. In the case of the board, it means that I set the price at the BatchPCB asking price: $15.90.
So if you've been waiting to get started on an ADI project, here's another impetus. Note that BatchPCB is a cheap service and in the "cheap/fast/good: pick two" situation, you get cheap and good. It takes a month or more to get a board back.
Finally, as another reminder, I absolutely do not endorse the ADI for use in aircraft. It's entirely untested, has never been deployed on any vehicle, much less an aircraft, and has never been checked for calibration. It's a fun toy I put together for my own amusement, and share with the world in the spirit of all things open-source. I hope you enjoy it, and I implore you not to stake your life on it.
Posted at 08:57 permanent link category: /gadgets
Thu, 22 Mar 2012
My replacement chest freezer has finally arrived, and more on that later, but I wanted to note that the little dorm fridge has settled down to an average daily consumption of 321 Wh per day, or 117.2 kWh/year. That's vastly different from the EnergyGuide label, which says 328 kWh/year.
As a point of comparison, a 2 W clock consumes 48 Wh/day, or 17.5 kWh/year. My stereo stack, if left powered, consumes 8 W when off, for 70 kWh/year (fortunately I turn it off its power supply when I'm not using it, for zero kWh/year). The watt-meter goes on the new fridge next, but I'm curious to get some long-term numbers on my computer, and one or two other things around the house.
Posted at 17:17 permanent link category: /gadgets
Fri, 17 Feb 2012
My fancy new oscilloscope (a Rigol DS1102E) finally arrived. Out of curiosity, I checked out the AM carrier wave on the transmitter I built a few weeks ago. It's... not so good.
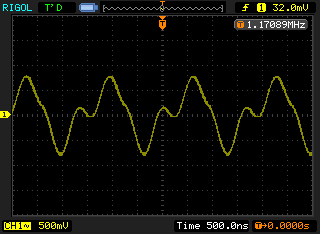
That's supposed to be a nice sine wave. Clearly shy of the mark. Still, how cool is it that I have an oscilloscope that can output an image file like that? For $400, that's pretty hard to beat.
Posted at 23:57 permanent link category: /gadgets
Fri, 13 Jan 2012
I am ridiculously pleased at this moment.

The new printed circuit board works perfectly! Well, very close, and close enough that I could slap this thing into a case and call it done!
Initial smoke testing (apply power, see if anything goes foom) came back negative, no smoke in evidence. Swapping the ATMega chips around proved to be more troublesome than I'd expected, but careful perseverence paid off. At first, the LCD wouldn't display anything, and I had this overwhelming moment of, "Oh jeez, where do I even start?" I don't have an oscilloscope any more, so I was limited to a multimeter for testing.
Fortunately, the first thing I tested ended up being the problem. The LCD's RW line (read-write? something like that) was at +5v, when it should have been at ground. I checked the layout, and, sure enough, that was the second LCD pin that I had incorrectly routed to power instead of ground. I clipped the wire, jumpered it temporarily to ground, and voila everything worked!
Final tally: two mistakes total, and both of those easily worked around. Not bad for my first-ever PCB design! I've already corrected both pins on the 1.1 version of the design (which will also include an ICSP header). I'm also pondering how this thing is going to get cased, and thinking about going with a premade case for simplicity's sake. That would also mean that anyone else who wanted to build the project would have one less step involved.
Overall, obviously I'm completely pleased. I didn't expect this thing to work right out of the box (to the extent that it does). Aside from two jumpers on the LCD, it's working exactly like I thought it would. When does that happen?
One interesting factor that's pretty surprising is the power consumption. I figured this board would be pulling down 100-150 mA, but even at full backlight, it's only drawing 40 mA at 7-15VDC in. There must be some power-hungry component on my cobbled-together system that's not present in this board (the USB chip is the only thing I can think of), but whatever it is, it's great news! At 40 mA (call it 50 for a bit of safety-factor), a set of 3AA batteries would theoretically power this thing for 50 hours! (Not really, of course -- once the voltage drops below about 4.3, it'd probably stop working.) Any vehicle's electrical system will take this load without even noticing it. Just shy of .03 watts! That's not a typo; point-zero-three.
I can't wait to get this thing in a case, although that is a completely different challenge, and one which is roughly commensurate with making the electronics in the first place, depending on how I go about it. I'm just amazed that it works, and so pleased I can call it "good enough," and move on to the next phase!
Posted at 22:11 permanent link category: /gadgets
Thu, 12 Jan 2012
The Penultimate in ADI Progress
After a fairly annoying day, I came home with a freshly-printed transparency of the top paste layer for the ADI board -- that is, what would soon become my solder stencil. I'm using solder paste on this project, and this allows me to apply it in a single swipe.
The advice from Sparkfun on creating a solder paste stencil is that you send out your stencil files, and have a production house do it. They also say, several different ways, that this is nowhere near the critical step you might think it is -- in other words, that close is good enough.
I took that advice to heart, and decided that I would give it a try in the most homebrewed way possible. I opened up the circuit board in Eagle, and selected only the tPaste layer to view. I printed this out, onto a standard laser jet transparency that I picked up at an office supply store. The box claims that it's a 5.3 mil thick sheet.
When I got home, transparency and new X-acto knife in hand, I very carefully cut just inside the tPaste lines (and only cutting out a smaller square in the middle of the CR2032's minus pad). This resulted in a somewhat amateurish, but serviceable-looking stencil. Granted, I wouldn't want to do this for hundreds of SMT devices, but for my three devices, it wasn't bad.
After that, I just swiped away with the paste (also from Sparkfun) and a utility razor blade. Voila! I did it twice, rejecting the first one as being a bit too messy on the BMP085, which has miniscule pads. The second attempt wasn't any better, so I just very carefully separated the adjoining solder paste blobs with the razor knife, and called it good enough.
I borrowed a hotplate from a friend who's treaded this path before me, in order to do the heating. The idea (as documented by Sparkfun here) is that you apply the paste, drop your components in place, then stick the whole mess on a hotplate or skillet. You heat it up until the solder liquifies, then you pull it off and let it cool down.
That is, more or less, what I did. I had checked beforehand with my handy IR thermometer, and found that this particular hotplate had a hotter spot in one area, so I determined that I would stick my board there. I cranked that sucker up to HIGH, dropped the board on the hotspot, and watched it carefully. Within about a minute, all the solder had gone liquid, and I pulled it off.
I actually think the heat was up too high (the plate itself got up over 320°C), as the board got a little scorched-looking on the bottom. I think it could have been set to a lower temperature and still done the job just fine. But scorching aside, the board looked great, and testing revealed no solder bridges on the BMP085, which was my only real concern.
The downside to this approach is that I now had a handful of components stuck to the board, and any real chance of doing a phased installation, with intermittent smoke checks, was gone. So I stuffed the whole board and soldered it all up. It looks great, but I haven't taken the final step of applying 7-30 VDC to the input terminal to see what goes foom.
In documenting the LCD connector, I did discover that I made one mistake: the pin 12 connection should be to ground, not to +5v. It's easy to work around, just don't attach a wire from pin 12 to the LCD, but it's a little silly. That fix will go into the next version.
My next step is to take my fate firmly by the horns, apply power, and see where the smoke escapes. For now, I think I'm going to go to bed while I can still ride the good feeling of making progress, without the disappointment of destroying components. Leave that for another day.
Posted at 23:59 permanent link category: /gadgets
Wed, 04 Jan 2012
I finally had some time this evening to sit down with my new ADI board and see if everything actually fit (it looked like it did on paper, but you can never tell for sure).
 fits!")
It actually all looks really good, with only one exception -- the potentiometer in the upper right hand corner doesn't fit into its space very well, the holes for the leads are a bit too skinny. I can make it work for the first version, and be perfectly happy with it, but I'll tweak that on the next version (which I've already started modifying, and will include an ICSP header above the processor, in that blank space toward the LCD connector).
Now I'm just waiting on getting a hotplate to do the surface mount parts (which I'm hoping to document for the ADI page). Well, I still have to confirm all the connections with a continuity tester, but I don't expect any problems there. I may be only a day or two from having a working one-board ADI!
Update: Three things, actually. First, by straightening out the legs of the potentiometer, it slid right in, so no changes required there.
Secondly, out of curiosity, I piled all the parts onto the balance to see what they weighed. Including too-long leads on most of the components, and a paper package around my 2032 battery (but no solder), the entire ADI weighs a mere 71 grams. Of course, a case and some wire is still required, but that's pretty light.
Finally, I did a quick sanity-check of the connections on the board, and they all look good. I still have to do a proper checklist, but things are looking very positive for this board actually working like I want it to.
Posted at 20:16 permanent link category: /gadgets
Tue, 03 Jan 2012
I knew this day was coming: the PCB has arrived! Only I was in for a surprise when I opened the package:

I ordered one, but I got two! Woot! Double woot!
I guess they must have been shy a few square inches, so they doubled up at least my order, probably a few others too. BatchPCB aggregates a bunch of small designs into one big board, which is the size preferred by the fabrication house. I guess mine was the right size to fit into an otherwise to-be-wasted space. Hooray!
I know how I'll be spending my evening...
Posted at 13:55 permanent link category: /gadgets
Thu, 08 Dec 2011
Progress indeed! I just uploaded my first PCB design to BatchPCB, and $27 later, I should be getting a shiny new PCB in the mail in about a month.
I updated the ADI page with the new circuit board layout files, and this puts me on hiatus until some time in January, when I'll get to experiment with surface-mount soldering and other such fun things. Who knows, the board might even work as expected! (I'm not holding my breath for that to be the case.)
I suppose in the mean time, I can work on things like the Construction Guide, or updating the web page to be a bit more useful and less "Hey, look at me talk a lot!"
Posted at 11:27 permanent link category: /gadgets
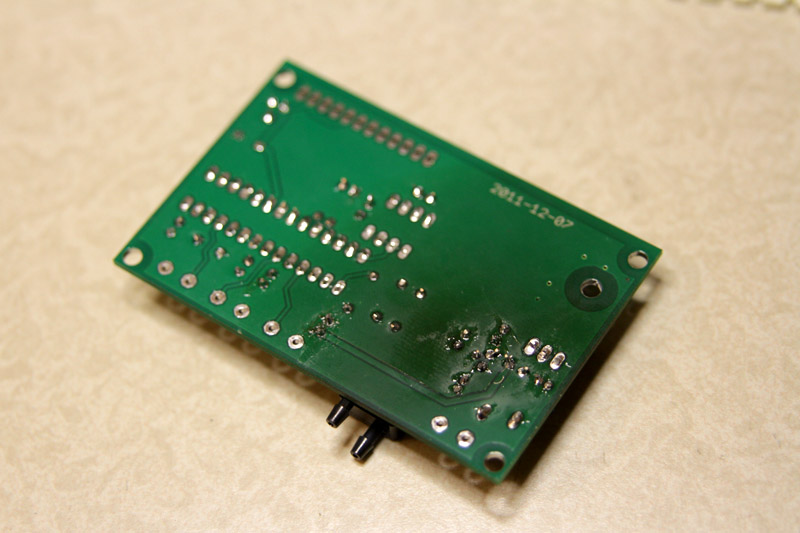
Wed, 30 Nov 2011
Things have not all been quiet on the Air Data Instrument front, although I haven't mentioned any of my progress here. Well, I change that now!
It's not done yet. But it's getting much closer.
I decided a few months back that I wanted to come up with a printed circuit board of my own, to make a much more compact version of the ADI. The whole "stick a bunch of breakout boards together" method is fine, but it's kind of bulky, and suffers from some pretty obvious weaknesses when it comes time to package it all up.
I've finally (I hope) come up with a schematic and a PCB design that I think will work. I've ordered all the parts I need to finish a couple of ADI boards (so I have spares for when I release the magic smoke -- I have no plans to offer anything but documents to anyone else). Next step is, once the parts arrive, to print out a copy of this board at life size and place all the parts to see what interferes, what doesn't line up, etc.
Then, if it all looks lovely, I can send the PCB design off to be fabbed, and if it comes back functional, I can confidently publish it as being finished, which would elicit a huge "Woot!" from me.
Of course, that leaves the whole "putting a case around it" problem, but that's an issue for a different day. For now, I'm content to say, "Oooh, pretty PCB."
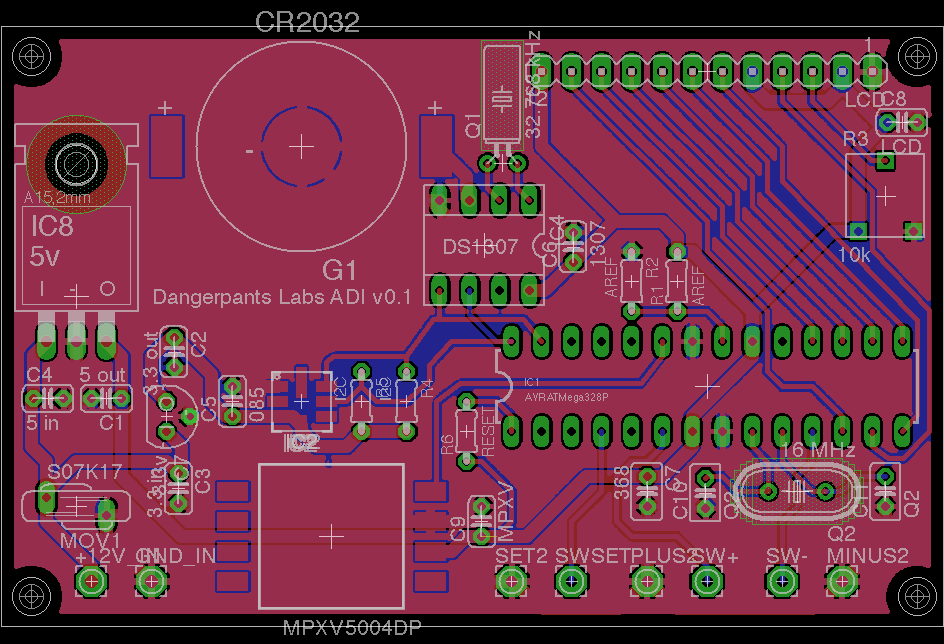
Posted at 08:56 permanent link category: /gadgets
Wed, 16 Nov 2011
My history with gadgets is long and varied. I've owned pocket-size computers for as long as I reasonably could, starting with the venerable HP 200 LX, which I purchased in early 1995. This tiny (for its time) wonder (for its time) ran DOS and sported a CGA screen, running for 20 hours on a set of AA batteries. It had a set of built-in apps which, if not perfect, were at least pretty good. And it had a full (including numeric pad) keyboard, which was quite typeable. I actually still have that wee beastie sitting in a box in the basement, but the lack of a backlight keeps me from seriously considering it anymore.
I graduated to a Compaq iPaq running Linux (deep, deep nerd), then to a Palm Tungsten T5, and finally, after many years of holding out, to an iPhone 3GS. Now, I find myself in possession of a Motorola Droid X, which was the white-hot coolest smartphone in the world for about three weeks in late 2010.
Up until the iPhone, none of my pocket computers (which I have variously called "Palmtops," "PDAs," and "smart phones") were particularly connected. The iPaq came closest, with a backpack that doubled its sleek, curved volume and would take a full-size PCMCIA card, including a wifi card. But really, I never had a connection until the iPhone. And, as things have progressed, the first really "cloud-enabled" device I've had has been the Droid.
The problem, for me, is that "the cloud" is a term which is roughly synonymous with "blind trust in people who have no vested interest in your privacy." Granted, the data connection to the Internet is paid for, but the services of Google's cloud are, only in the most tenuous way possible, tied to any sort of financial transaction. Thus, Google's interest in my privacy is largely academic, or at least reputational.
So, I have been unhappy about the idea of putting my data into "the cloud." Some of it, sure. Facebook, whatever. I don't put anything I actually care about there -- what goes up here (which is imported into the cloud) and there (which is the cloud, and with a decidedly antagonistic view toward your and my privacy) is, more or less, fluff.
I do have data I care about, though. Obviously financial data, social security numbers and the like, sure. But I care about my schedule. It does a couple of things: first, it tells me where I need/want to be, so reliability is high on my list. Second, it tells anyone who cares to look at it exactly where I am to be found, and when. Without engaging full-on paranoia mode, there's a lot of value to certain other people in such data. For instance, people who are interested in liberating you from whatever material possessions you might not be actively guarding at a given moment. I'm sure there are many other more-or-less-frightening uses for someone's schedule.
So it was with a great deal of trepidation (as I wrote about before) that I started using the Droid X, with its inherently cloud-based everything. I refused, in fact, to use the calendar, instead buying a classy paper calendar book to carry around for my personal use. But I wasn't happy with that. I don't want to carry around extra crap.
So I was very pleased when the calendar silently upgraded itself to suddenly include a "phone" storage option for the calendar. This was several months ago. I gleefully ditched the paper calendar, and shoved all my temporal data into the phone's little memory banks.
For a few months, all was good with this little world. My schedule was safely under my control, and unlike a paper calendar, the phone would actually make little beeping noises at me to remind me of things I'd scheduled for myself. But you can see where this is going.
A few weeks ago, for no apparent reason, the alarms stopped feepling and jingling. Then they'd go off 23 minutes after the event had started (and not the 15 or 30 minutes before that I'd requested). Sometimes they didn't go off at all. It got to be very discouraging.
Then, tonight, I went to look up plans around Christmas, and discovered that, to my horror, events I'd placed in September were showing up (sometimes having moved, sometimes having been duplicated) in December.
You may recall that I said earlier that reliability is one of my watchwords. If I put an event in the calendar, it damn well better stay there. And you know, until this Android wheeze, it did. The iPhone, the Palm, the iPaq running Linux, the 80186-based HP 200LX, they all kept my schedule exactly as I'd entered it. Without fail. It wasn't always pretty, I didn't always love the interface, but the data was always there.
Well, without belaboring the point any further, Google has failed me. They may be striving to do no evil, but neglect is about as bad, as far as I'm concerned. The paper calendar came out tonight, and I'll be transferring everything that may or may not be correctly recorded in the phone's little scattered memory banks, and acquiring a fresh 2012 calendar on the morrow. I'm no longer interested in being subject to Google's whims, evil or not.
Posted at 21:34 permanent link category: /gadgets
Tue, 26 Jul 2011
I've been idly working on the ADI project when I've had a few moments, but I ran into something strange in the last few days.
I'd make a change to the code (at the time, trying to make the metric VSI display more useful), and all of a sudden, the ADI would start rebooting at random times, or get all wacky on me. Then I recalled a discussion I'd had with my friend Clint about the practical limits of an Arduino.
One of those limits (and one I hadn't considered before this conversation) is RAM. The ATmega328, the processor inside the Arduino Uno, has 2k of it. 2048 little bytes. And every string you load up, and every static or global variable, takes up some of that space, before you can even start running.
I didn't even need to do the math (although once I did, it was pretty silly): I have a splash screen with 17 characters times 5 lines. I have a menu with 7 items, each of which has a 17 character title. I have at least two data-smoothing buffers (and was adding a third when I realized what was going on), of 32 entries at 4 bytes per entry. I haven't bothered to count the global and static variables, but there are probably a dozen or two. Some of them are big, complex structs taking up many dozens of bytes each. The data buffers alone account for 384 bytes. The strings take up around 200 bytes. I'm well over a quarter through my RAM, and I haven't even started to run yet.
So, I pushed some of the strings out to flash (of which there's 32 kB), and shrunk the data-smoothing buffers down to 16 entries each. Suddenly, everything Just Works. It is a lovely and delightful thing when that happens. Interesting side-effect: the smoothed displays are still stable enough to be useful, and now they react faster. Woot!
Posted at 14:24 permanent link category: /gadgets
Mon, 25 Jul 2011
I had a long idle time this weekend (this is a good thing -- it means the theater wasn't breaking), and I decided to work on the new ADI page.
It's not done yet, but if you wanted to get a glimpse at what I'm preparing, you can see it in-progress:
The Dangerpants Labs Air Data Instrument
Posted at 11:42 permanent link category: /gadgets
Categories: all aviation Building a Biplane bicycle gadgets misc motorcycle theater