Categories: all aviation Building a Biplane bicycle gadgets misc motorcycle theater
Tue, 27 Jun 2017
Building a Biplane: Finally, A Real Airplane Part
As the clock rolled past 10 pm, and bedtime was looming, I mixed up the second batch of epoxy, and set to work. I had been working for the last hour and a half making the final preparation for finishing off the first Real Airplane Part of my build: a wing rib.
It all started, for the purposes of this story, on March 19th, 2017, when I placed the order for the 1/4" capstrip and aircraft-grade plywood that would make up the majority of the materials needed to build the wing ribs. Wing ribs are the airfoil shaped pieces that are parallel to the airflow over a wing, and give it the correctly shaped cross-section. There are around 60 in the Marquart Charger, in a variety of forms.
I ordered the capstrip knowing it would take a while to arrive, but I didn't imagine it would take as long as it did: almost exactly three months. Still, I had a plan to use up some of that time productively, as previously documented. I would build up the templates and jigs that would enable me to build ribs once I had all the materials on hand.
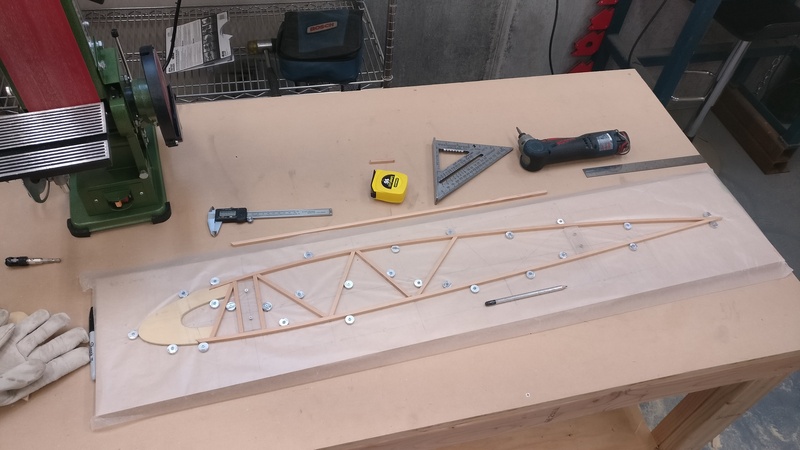
In-progress rib jig
After about two months of waiting with gradually decreasing patience, I went out to a local hardwood retailer (with huge eyes, and massive self-restraint) and bought a few sticks of wonderfully tight-grained Douglas Fir. This was cut down into 1/4" sticks which would fill in until the proper Spruce arrived. I used this and the previously created nose template to make up a gloriously fake rib jig (seen above in progress).
Finally, the day arrived, and my order from Wicks arrived: a selection of mahogany plywood (1/16", 1/8" and 1/4" thick -- imagine for a moment 1/16" plywood, that's less than 2mm thick), my 650 feet of 1/4" capstrip, and some random spruce blocks that will doubtless come in handy in the future.
Still, I couldn't leap in like I might have wanted to: my schedule was packed to the gills with other projects -- I hadn't known when the wood would ship, and wasn't going to put my life on hold waiting. So, I had some theatrical engagements take up my evenings, and a weekend of lovely weather saw us painting the outside of the garage rather than me working on ribs inside it.
The process also ended up taking longer than I had expected, with more setbacks than I had anticipated: cutting plywood for the gussets with a razor knife, the tip of the knife broke off without me realizing it, and I spent some very unproductive minutes scraping unsharpened steel against the final ply; mixing the glue demonstrated that my glue-dispensing skills are rusty (it needs to be mixed 1:1 to work right); cutting template pieces out of cardboard proved useful, but took more than an hour; and the staple gun started misfiring until I realized I'd never oiled it (it's brand new). I had cut the sticks for the rib last week, so I spent two evenings this week just getting the gussets and staple gun sorted out.
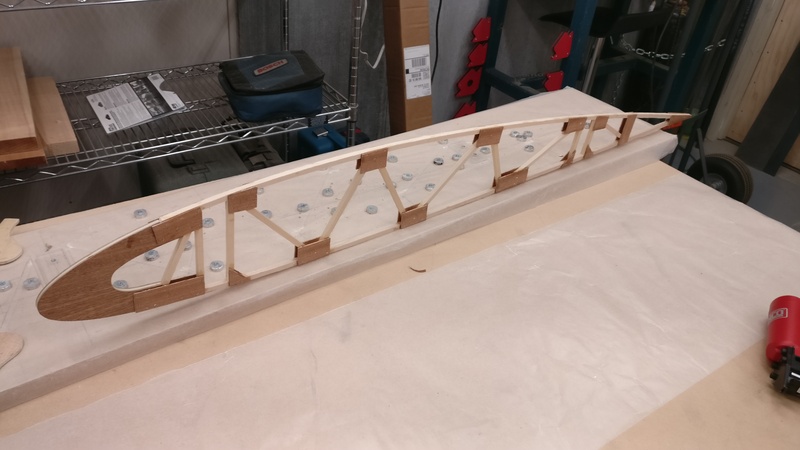
Completed wing rib
Still, last night I was able to hold up a completed wing rib for the first time ever. It's only the first of about a zillion pieces, and more head-scratching than I care to think about. I may not even use it in the plane as I answer my own questions about glue mixture and staple placement. But it's done, and I've taken the first real step on the path to building a biplane.
How do you eat an elephant? Well, one bite at a time.
Posted at 16:13 permanent link category: /charger
Categories: all aviation Building a Biplane bicycle gadgets misc motorcycle theater